I love doing crafty things with my eight year old daughter. We saw this idea on Pinterest and decided we wanted to give it a try. It seemed like it would be the perfect gift for Mother’s Day, or Father’s Day, or grandparents or her teacher. So we looked up the directions on The Sharpie Blog and headed to our local hardware store! We bought 4 inch white ceramic tiles for $.16 each and felt for $.29 per 9”x12” piece. All of the other supplies I already had in my crafting arsenal. I felt like it couldn’t get any cheaper!

You will need:
Sharpie permanent markers
Plain color ceramic tiles (we chose white)
Rubbing alcohol
Eye dropper or straw
Spray sealant
Hot glue and gun
Felt (for backing) any color (we chose black)
Here is how we made our coasters:
- Spread out some newspaper to protect your work surface. You are using permanent makers and making it run with the alcohol. Cover your work surface and do not wear anything you want to get ruined. Lay out your tiles.
- Thoroughly wash your tile off with soap and water. Dry.
- Grab your first tile and start scribbling away with your Sharpie marker! We found that making color blocks and alternating light and dark colors worked best for us. We tried making designs and patterns but it all “washed” away when we added the alcohol.
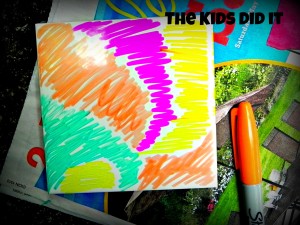
- Once your tile is covered in color, lay it down and pick up your eye dropper (or straw). Pick up some alcohol with the dropper and dribble or drop small pools onto your colored tile. We found that starting with quarter sized pools worked well to start with. The more alcohol you add the runnier the colors will become, creating a beautiful watery effect. Sorry, I didn’t get any pictures of this step. I was having too much fun dripping and dribbling, watching the colors “bloom” into each other!
- Move on to the next tile and repeat the process until you’ve decorated all your tiles.
- Let the alcohol dry (this takes 15-30 minutes, depending on how much you used). If you are not happy with the way your tiles look, try dripping on some more alcohol and it will make the colors spread out again. If you really don’t like the way they look, wet the tile again with alcohol and wipe it off with a dry paper towel and start over!
- Once you are happy with the way they look, lightly spray with spray sealant. If you spray it on too thick, the sealant will smear your color. I did three very light coats, letting each coat dry for about 15 minutes before I sprayed it again. Once I had finished spraying the tiles I let them dry over night (you don’t need to do that, it just makes me feel better).
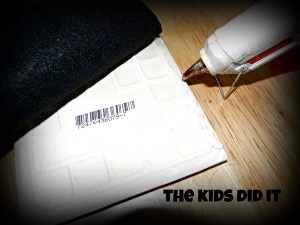
- Once the tiles are completely dry, measure them (my 4” tiles were actually 4 ¼”) and cut your felt to match the size. You want the felt to cover the entire bottom of the tile.
- I then used my hot glue gun to glue the felt to the bottom (my daughter did not help with this step). I glued one edge at a time going all around the tile.
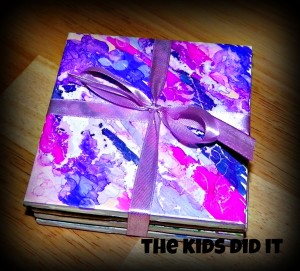
- All finished!! Stack them up and tie a pretty bow around them and you have a beautiful handmade gift!!
How easy, and beautiful! I’m going to Michaels to get what I need and I can make some with the grandkids on Sunday.
This is a great post. Your information is very helpful. I think my daughter would be very happy to see the gift. This is a creative idea.
Thanks for sharing the excellent post!
Absolutely love this, I have an obsession with Sharpies and this would be a fun project to do with the kids. My kids even have their own set so they don’t steal mine. #sharpiesnob #proudofit
this is so interesting thank you!
Those are super pretty! Love the bright colors!
Great idea! Fun, easy & immediate! Thanks for the idea!
These are fantastic and so creative. They look great. Thanks for posting!
These are really cute. My daughter made me one at school for Mother’s day this year.
These are beautiful. What a great gift idea. Thanks for posting!
This is awesome! I’m going to pin this so I remember it for Christmas gifts!
what kind of “sealant” did you use? A spray polyurethane? thanks! they are gorgeous!
Can you use hair spray as a sealant? I am conducting a children’s program at work [ library]
I know this post was especially written for Mother’s Day – but I love the idea for gift giving all year round – not to mention yourself. I love the colors and designs one can create!
This looks like a really fun, and creative crafting project – to challenge your imagination and the artist hiding inside of you.
I like it so much in fact – I’m going to Pin it to TWO of my boards: one for Artsy Crafing and the other on Gifts!
Thanks for sharing!