I love giving gifts. I love seeing someone’s reaction when you surprise them with something special. What I don’t love is spending $5 on a gift bag, to put the gift in, that I know is just going to end up in the trash. My solution? Start giving gifts in bags that will be reused. Think reusable shopping bags. You can find them at just about any store you shop at now-a-days for a buck or two and now they are available in all kinds of colors and patterns! Perfect! Or the next time you head to your local craft store, or browse Amazon, check out the canvas bags section. These are usually fairly cheap (especially if they are on clearance or you have your trusty Michael’s coupons) and they are wonderful to customize!
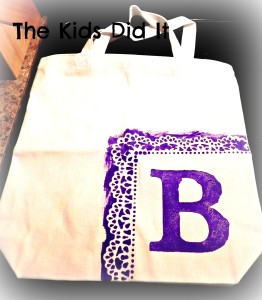
We often do a simple monogram to make it a personal gift. My daughter and I found this idea on Pinterest, but there were no directions, just pictures. We went ahead and tried it anyway and decided to make this part of her teacher gifts for the end of the school year. I have also done this for hostess gifts, birthday bags and coworker gifts; just about any occasion works! And the gift receiver has a completely usable gift! Nothing to throw away! How very green!!
You will need:
Masking tape
Double sided tape (or roll regular tape into a loop)
Large doilie or fancy edged paper
1”-2” Sponge brush
How to do it:
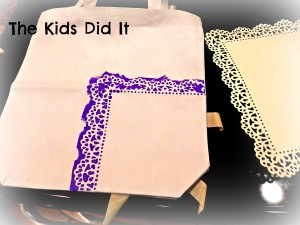
Lay your canvas bag out flat.
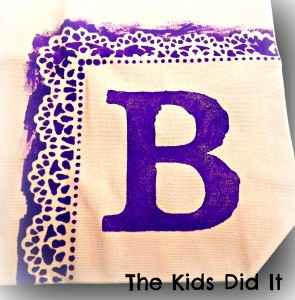
Decide where you want your monogram. We really like the way the corner/edge monogram looks, but we have also used a large round doilie in the middle of the bag so the monogram is front and center.
Place your doilie or edged paper wherever you like and secure from the backside with masking tape. This will help keep the doilie in place while you are painting.
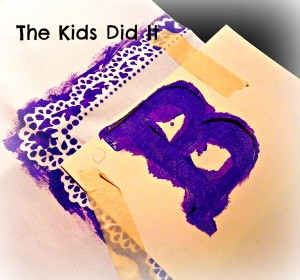
Dip your sponge brush into a bit of acrylic paint and dab it onto the cut out edges of the doilie or paper. The more paint you use the more “blurred” the edges will be, the less you use the crisper the edges will be. I prefer somewhere in the middle. I like it to look just a tad bit messy. To me it looks a bit more organic or handmade. That being said, try not to go overboard, you don’t want it to look like a messy glop of paint.
Let that dry for about 10 minutes before you remove the doilie.
Once it’s fairly dry, gently remove the doilie. Now you will want to measure the blank space created by the inside part of the doilie to determine how large your letter should be.
Once you’ve figured out the size you will need, let’s prepare your letter stencil or mask. I recommend using a fairly basic block style letter. I’ve tried using calligraphy style letters and also some swirly style letters and they don’t turn out quite as nicely. Too much small detail. Plus the sturdy block style letters contrast nicely with the lacey doilie edges. I have tried making my stencils/masks a few different ways. You can always freehand your letter onto the bag and paint it in. For me this was too time consuming and I could never get the letter to look the way I wanted it to. I have also tried printing out a large letter on my computer, cutting out the letter (tossing it) and using the negative as my stencil. That actually worked out nicely, especially when I printed the letter out on cardstock (a little stiffer than regular computer paper makes the painting easier). So my next idea was to cut the letter out on a die-cut machine (I’m lucky enough to have a Cricut but I think any machine would work), toss the actual letter and again use the negative for your stencil.
Attach the stencil using double sided tape (or the handy rolled over tape works well too). Try to attach it so it doesn’t wiggle around too much.
Again, dip your sponge brush into some acrylic paint and dab it on until you are satisfied with the way the letter looks.
Let that dry about 10 minutes before you remove the stencil.
Once you remove the stencil let it sit overnight (to make sure it’s completely dry) before filling it with any gifts.
Voila! The perfect gift bag…that won’t end up in the trash!
I think these would be great to make for trick or treat bags! They would be easy to personalize and a fun Halloween project! I just got some plastic stencils in the mail from Fiora with different Halloween items on them that would be perfect!! Thanks for the idea.. and I love the purple color you used on your bag 🙂
babydjs_mom@yahoo.com
These would make terrific gifts for friends and family! Thanks for trying it out and sharing.
Meg recently posted..50% Off Deal When You Order A Box Of Great Products For Your Child
I love this idea. We use reusable shopping bags but we don’t have any that are personalized!
I love re-usable bags especially this one since it is personalized. This would make a great gift idea
I love this idea! Especially the tip to use this as a gift-bag – so obvious, but nothing I would have thought of. What a great website you have here.
-Buffi
Buffi recently posted..Dancin’ with Molly?